02 - Creating a Spring Boot project with H2 and ThyMeLeaf
Introduction
Follow this guide and try to implement this project with its documentation.
Be sure to select at least these dependencies for H2, JPA and JDBC compatibility:
- Spring Web
- Spring Boot DevTools
- Spring Data JPA
- H2 Database
- Spring JDBC
Getting Started
Download and initialize H2 in Console mode
You can also download the latest version from the GitHub repository, in the release branch, by executing the following command:
Unzip the file and execute the script in the bin folder:
# Unzip the downloaded file
unzip h2-YYYY-mm-dd.zip
# Change directory
cd bin
# Execute the script
./h2.sh
Now a H2 Database Engine icon shall appear in the task bar of your desktop and a new browser window will appear pointing to http://127.0.1.1:8082, the H2 web console:
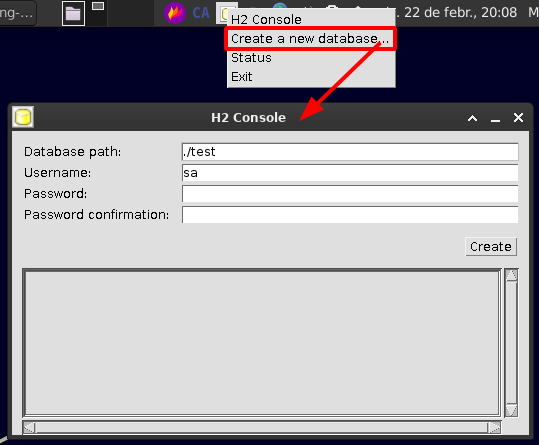
With this, you can initialize a local DB file and interact with it through the H2 console. When the H2 Console is stopped, the H2 database file can then be accessed through any IDE, like IntelliJ IDEA
Create a new database
The DB will be locally created. This will provide us with a new URL to access from the web console manager.
The JDBC URL should be something like jdbc:h2:./<db-name>, being it a relative route to the h2 jar file.
The shell script launches the H2 jar in Console mode, thus it isn’t accessible as a H2 server. If you want to use it as server, you must launch the H2 application like this:
$ java -cp h2*.jar org.h2.tools.Server
TCP server running at tcp://127.0.1.1:9092 (only local connections)
PG server running at pg://127.0.1.1:5435 (only local connections)
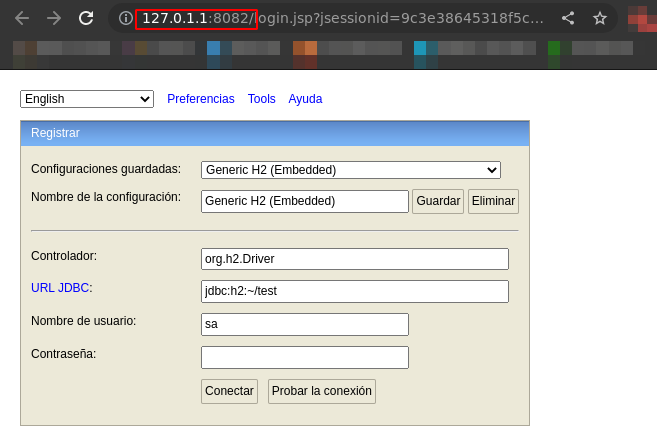
Web Console server running at http://127.0.1.1:8082 (only local connections)
S'està obrint a la sessió actual del navegadorYou can’t connect with a web browser to the jdbc:h2:tcp://localhost/~/<db-name> URL, this is only achievable using a H2 client (over JDBC).
Login:
- Saved settings: Generic H2 (Server)
- Setting Name: Generic H2 (Server)
- Driver Class: org.h2.Driver
- JDBC URL: jdbc:h2:./
<db-name> - User Name:
<db-username> - Password:
<db-password>
Configuring Spring Boot project
Modify the application.yml to include the H2 Datasources parameters (and also the JPA ones):
Make sure you stop the H2 Console before trying to connect via IDE, or launch the H2 jar as Server and access the DB through a jdbc:h2:tcp://localhost:port/<db-path> URL to allow multiple connections at the same time.
application.yml
spring:
  main:
    banner-mode: off
  application:
    name: spring-lab-0-approach-1
  h2:
    console:
      enabled: 'true'
  datasource:
    #url: jdbc:h2:mem:mydb # Creates the DB in memory
    #url: jdbc:h2:file:~/demodb # Creates the DB file in "/home/$USER/demodb.mv.db"
    # In order to access local DB, we must enter the absolute or relative path to the file
    # Ex: if the DB file is allocated in the root of the project --> jdbc:h2:./<db-name>
    # Ex: if the DB file is in the home directory --> jdbc:h2:~/<db-name>
    #url: jdbc:h2:/media/protoss/Dades/github/CIFO/CIFO-Web-Applications/java-exercises/spring-boot-projects/h2/library;DB_CLOSE_ON_EXIT=TRUE;FILE_LOCK=NO
    # Accessing remote H2 servers:
    # DB files are stored in the same path as the h2 .jar file
    url: jdbc:h2:tcp://localhost:9092/library;DB_CLOSE_ON_EXIT=TRUE;FILE_LOCK=NO
    username: cifoweb
    password: cifotest
    driverClassName: org.h2.Driver
  jpa:
    database-platform: org.hibernate.dialect.H2Dialect
    hibernate:
      dialect: org.hibernate.dialect.H2Dialect
      ddl-auto: create
  mvc:
    pathmatch:
      matching-strategy: ant-path-matcher
Adapting project to SpringBoot
Take as an example the Book class from the Lab SE03-2. Now we’ll include annotations to define what @Entity it represents and in what @Table it must persist. Also, for each attribute we’ll define its DB field name using @Column or in case of other entities, @ManyToMany, @OneToMany, @OneToOne or @ManyToOne.
Dependency injection (@Autowired)
What is a dependency injection? It’s a SpringBoot feature that automatically wires a bean from the Spring application context into a class field or method.
Explain what a dependency injection is
Preparing the frontend
The frontend is rendered using Thymeleaf engine to easily allow requests to the Spring Boot controller.
![]()
Explain Thymeleaf
Launching the server
Run the application from IntelliJ for now. Later on we’ll explain how to build and package it for deployment.
Accessing the server
Server will be available through the declared server port in the application.properties or application.yml file. If not defined, as springboot is using Tomcat, the default port will be 8080.